Endpoint Services, MECM, Out-of-Box Imaging
Overview
This article provides information on out-of-the-box imaging for Windows via MECM.
Systems
Intended Audience
University of Illinois IT Pros leveraging MECM, hosted by Technology Services' Endpoint Services team
Actions
- Gather Information
- Create AD Object
- Import System into MECM
- Verify if in Deploy Collection - add as needed
- Review UEFI Settings to allow PXE
- PXE Boot
- Select Task Sequence
- Support
- If using an on-board NIC, system MAC address
- If using a dongle, SMBIOS GUID
-
On a machine with Windows pre-installed:
-
Open command prompt by opening the Start Menu and typing 'cmd'. Then select the command prompt.
-
Run this command: wmic csproduct get uuid
-
Record the output from this command
-
-
On a machine without Windows pre-installed, use one of the following methods:
- Use boot media to obtain the SMBIOS GUID
-
Build MECM boot media per this guide: Endpoint Services, MECM, Create bootable media
-
Boot from the MECM boot media
-
After WinPE has loaded, press 'F8' to open up a command prompt.
-
Type the following into the command prompt: 'wmic csproduct get uuid'
-
Record the output from this command.
-
- Or, use the distribution point's PXE log to obtain the SMBIOS GUID
- Open the SMSPXE.log on your unit's distribution point with Support Center or CMTrace - typically located at '%SystemDrive%\SMS_DP$\sms\logs'
- PXE boot the computer per the 'PXE boot section' below
- Watch the SMSPXE.log update in real-time and copy the SMBIOS GUID from the most recent log entry
- Use boot media to obtain the SMBIOS GUID
- The SMBIOS GUID may also be available in the BIOS. This will vary between makes and models.
-
- The naming convention for your unit's endpoints
Create AD Object
MECM can create the AD computer object and bind the machine during imaging. Due recent changes to domain joining, a device must be joined to AD using the same account that created the object. See this article for more information.
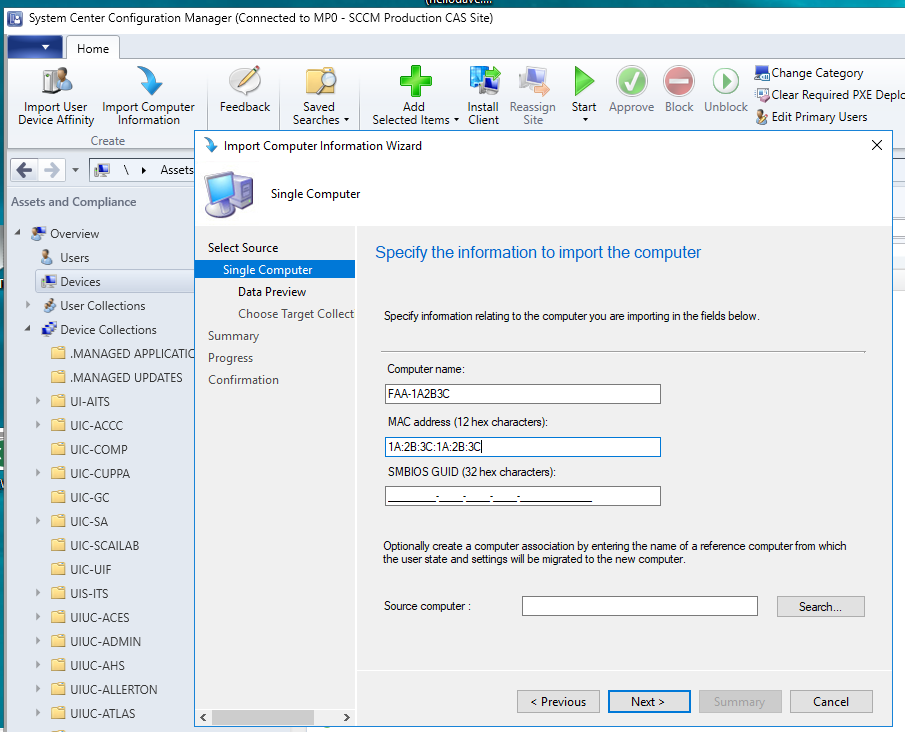
- Fill out the following fields:
- computer name (your naming convention)
- MAC address (if onboard NIC or bootable dock)
- SMBIOS GUID (if using a dongle)
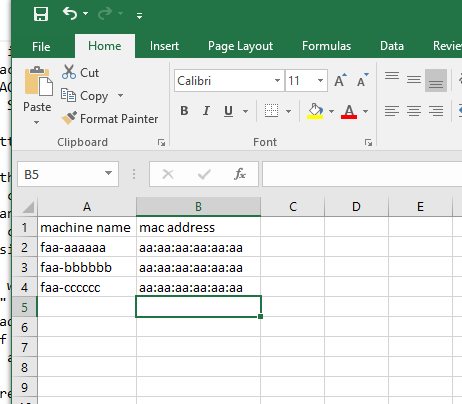
- Create a csv using the following information:
- Give column A the heading of 'Machine Name'
- Give column B the heading of 'MAC Address' or 'SMBIOS GUID'
- Fill out name & MAC address or SMBIOS GUID under appropriate headings
- Save the csv
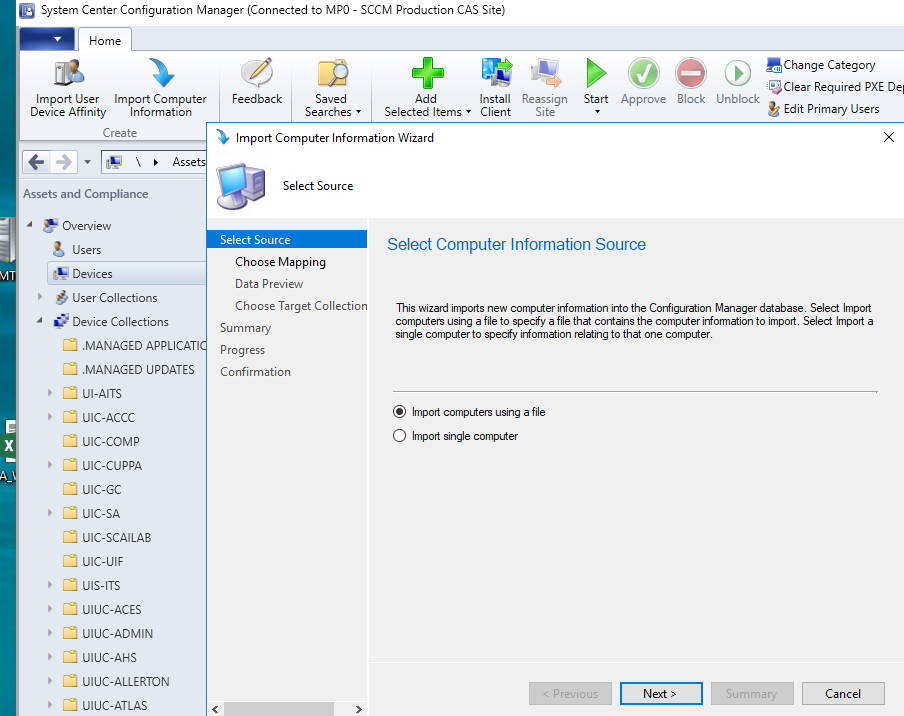
- Select the 'Import computers using a file' button and click 'Next'
- Click 'Browse' and navigate where the csv was saved
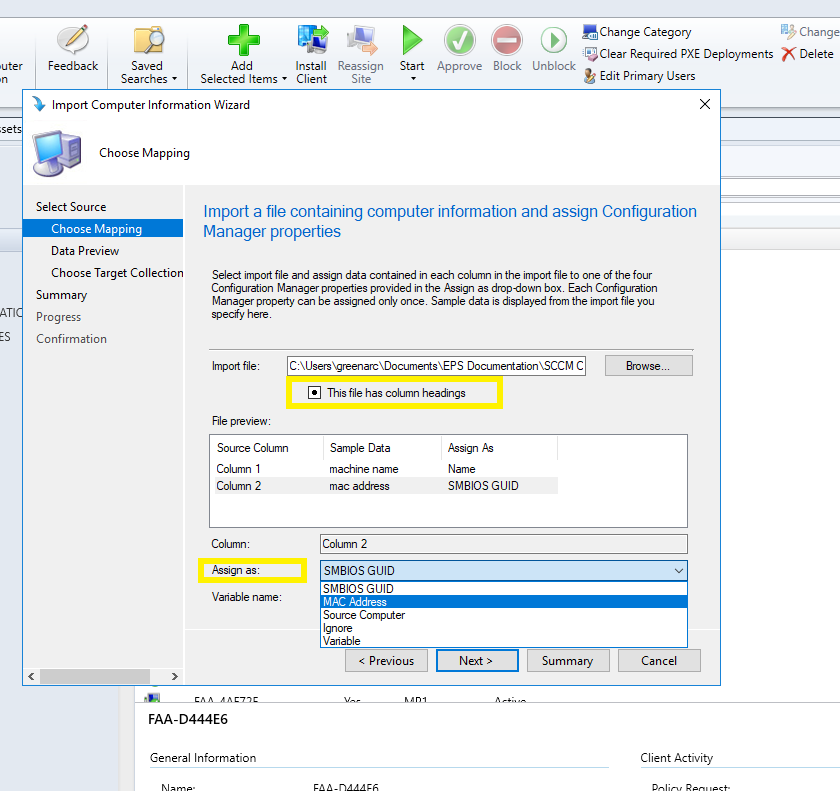
- If headings were used in the csv, select 'This file has column headings'
- Note the 'File preview' window and review the data
- The 'File preview' will show three columns: Source Column, Sample Data, Assign As
- Each row within the File preview windows can be selected
- Review and ensure that the 'Name' column is Assigned As: Name
- Review and ensure that the 'MAC address' column is Assigned As: MAC address
- If using SMBIOS GUID instead of MAC address, ensure the appropriate column is Assigned As: SMBIOS GUID
- The "Assign As" can be modified as needed via the drop-down menu
- Click 'Next' and review the Data Preview
- Click 'Next'
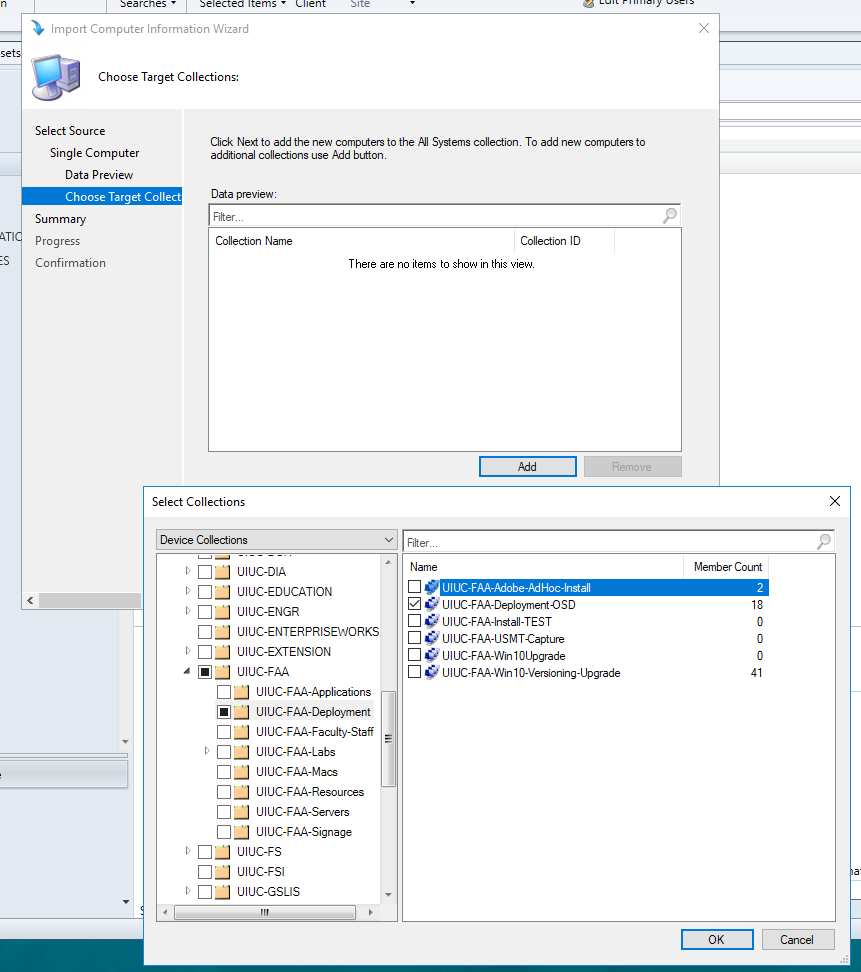
- Choose 'Target Collection' and click 'Add'
- Select your unit's MECM folder and navigate to where your OS Deploy collection is located
- Select that collection
- Click 'Next' as needed to finalize the import
- Navigate to the collection where you have configured your OS Deploy Task Sequence and update its membership (this can take 15 minutes) and verify that the newly imported machine exists in the deploy collection
- If no, you can add the system to the proper collection again by:
- Assets and Compliance > Devices > Unit > All Systems
- Locate the System > Add Selected Item > choose Add Selected Items to Existing Device Collection > choose the proper Device Collection
- Check UEFI first boot option
- Enable UEFI network stack for PXE
- Enable IPV4 (disable IPV6 unless the network is configured for IPV6)
- Uncheck Legacy Option ROMs
- TPM on & enabled
- Power on machine and press appropriate button combination for the system manufacturer to select boot media:
- Dell - press F12
- Lenovo - press Enter
- HP - escape
- Surface power plus up volume
- The WinPE environment will load and prompt you to select a task sequence that is currently deployed to your Deploy Collection
- Highlight the task sequence
- Select 'Next'