cPanel, How to use Dreamweaver to publish HTML pages on cPanel
You can use SFTP to connect Dreamweaver to cPanel. The easiest method for you will depend on whether the domain name matches your NetID or not.
NetID matches domain name: NetID and password OK
If you're using yournetid.web.illinois.edu, you can use your NetID and NetID password to make your connection.
- Use the Site Setup tool to create a new Dreamweaver site definition.
- Under Local, choose the directory on your computer that you wish to use for your Dreamweaver working directory for this site.
- Under Servers, click the + button to add a new server definition.
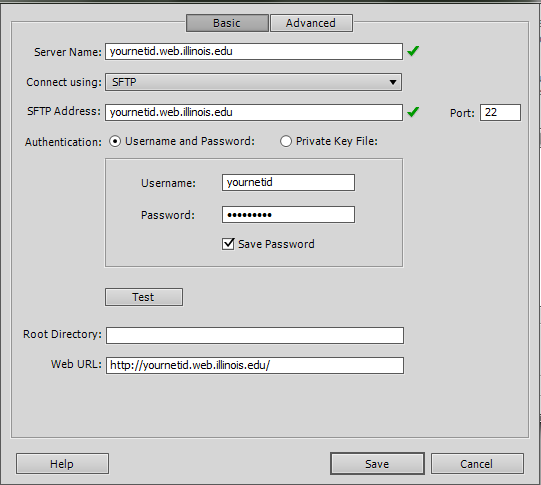
- Fill out the window as follows. (Substitute your own NetID where you see the word yournetid below.)
- Server name: yournetid.web.illinois.edu SFTP
- Connect using: SFTP
- SFTP address: yournetid.web.illinois.edu
- Port: 22
- Authentication: Password
- Save password: Your choice whether to check or not
- Click Test.
- If the test connection succeeds, click Save.
NetID different than domain name: Keys needed
If your NetID is different than your domain name – we're using yoursitename as an example below – then you'll need to generate SSH keys.
- Create a SSH key pair as described below.
- Use your private key with Dreamweaver's SFTP server connection process.
Creating Keys
If you already have a SSH key you can use, you can skip this section and use it in Dreamweaver (described below).
If you need a new key for yourself or for another user, CPanel has a built-in mechanism for generating SSH keys. Please use a different key for each user.
- Choose SSH Access from your cPanel Dashboard
- Click Manage SSH keys
- Click Generate new key
- Fill in the form with the key name, password, key type, and key size
- Click Generate Key
- Click Go Back
- Find your key in the list of Public Keys and click Manage
- Click Authorize, then Go Back
- In the Private Keys section, click View/Download
- Download your key and store it in a private location on your computer. (Don't place it in a shared folder or cloud synchronizing folder.)
Configuring Dreamweaver to use SFTP with Keys
- Use the Site Setup tool to create a new Dreamweaver site definition.
- Under Local, choose the directory on your computer that you wish to use for your Dreamweaver working directory for this site.
- Under Servers, click the + button to add a new server definition.
- Fill out the window as follows substituting your site's name where you see yoursitename below:
- Server name: yoursitename.web.illinois.edu SFTP
- Connect using: SFTP
- SFTP address: yoursitename.web.illinois.edu
- Port: 22
- Authentication: Private key file
- User name: This is the cPanel Account name. You can find it in the top navigation bar of your cPanel Dashboard.
- Identity file: On your computer, select the private key you downloaded in step 9 above.
- Passphrase: Enter the password you created in step 4 above.
- Save Passphrase: Check the box to save the passphrase.
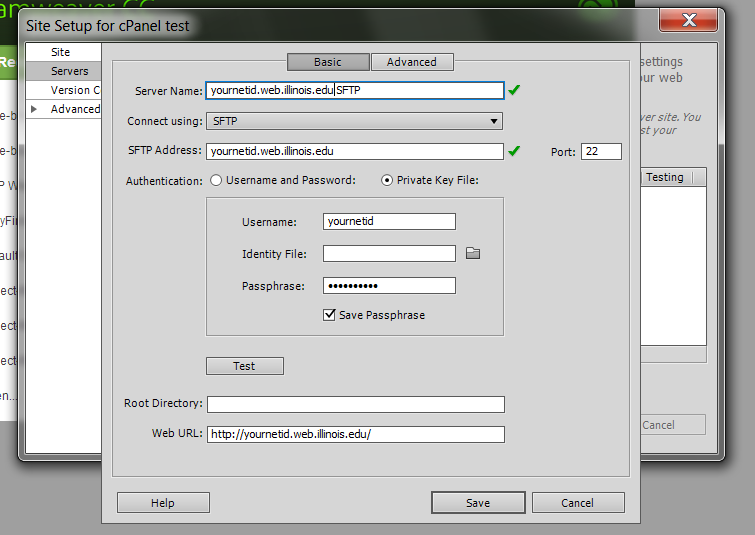
- Click the Test button to check whether you can make a successful connection.
- If not, double check your private key file, your password, and whether the NetID you're using is the primary account owner for this site. Also double check that the private key you're using is listed as Authorized in cPanel (step 8 above).
- Once you've completed a successful test, click Save.
- Your new server definition will appear in the list of available servers in Dreamweaver. Click Save again.
- Dreamweaver will rebuild its cache