Zoom, How to protect your sessions
- Accessing your Zoom Meeting Settings
- Meeting Setup Options
- Options for In-Progress Meetings
- Tips for Publicly Accessible Meetings
If you need to host public meetings where most participants are outside the University of Illinois System, we strongly recommend you use a Zoom webinar for your event.
Please, do not post your Zoom meeting information (meeting ID, meeting link or passcode) to public forums or social media. Do not edit or disable the default meeting settings unless you are aware of, and accept the risk associated with doing so. Limit in-meeting participant features to only those participants require. If you must post information to a public forum or social media, and you require the interaction features of a Zoom meeting, require meeting registration and only publicly share registration links. If you require meeting registration, verify and manually approve each registrant. Utilize meeting authentication and the waiting room to block unwanted guests from joining. More information about protecting your Zoom session can be found below.
If you have any questions or require assistance with your event, please reach out to the Technology Services IT Service Desk by creating a ticket at help.uillinois.edu, or by calling 217-244-7000, or emailing consult@illinois.edu.
All Zoom disruptions should be promptly reported to the Technology Services Privacy and Security team at: security@illinois.edu
Accessing your Zoom Meeting Settings
Follow the instructions below to access Zoom settings. Note: Some of your Zoom settings are controlled only at illinois.zoom.us/profile/setting. Others can be set by default at illinois.zoom.us/profile/setting and reconfigured for each meeting instance. Application dependent settings are set within the Zoom mobile or desktop clients. To access your default Zoom settings, please navigate to illinois.zoom.us/profile/setting. Alternatively you can follow the steps below:
- Go to https://illinois.zoom.us and click the Sign in button.
- Enter your NetID and university password, then accept the 2FA prompt (if necessary).
- Click Settings on the left-hand side of the screen. This will take you to the "Settings" page which has three sections across the top: Meeting, Recording, and Telephone.
- Select Meeting.

Meeting Setup Options
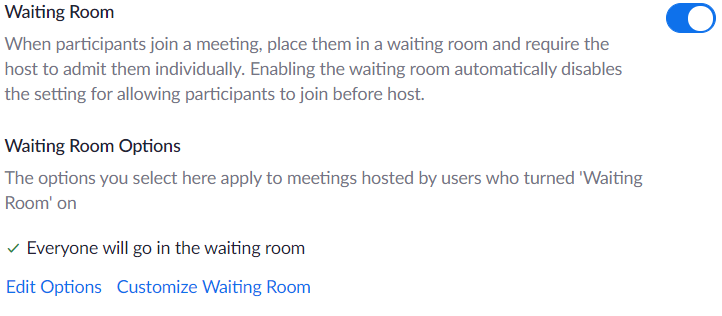
The Waiting Room feature in Zoom allows you to control when a participant joins the meeting. You can set up the Waiting Room so that only un-authenticated UIUC Zoom or participants outside of the UIUC Zoom account are placed there. Please read below on how to customize your waiting room profile. By default, the host or co-host must admit guests from the waiting room into the meeting.
Editing the Waiting Room Options

You can decide in advance who is placed in your meeting's waiting room using your illinois.zoom.us settings. We strongly recommend you consider your audience and the potential security risks when choosing the options below.
- Access your settings using the instructions above, and find the Waiting Room setting near the top of the Security subsection.
- Click Edit Options
- Configure who should go in the waiting room based on your attendees.
- Everyone: All participants joining your meeting will be admitted to the waiting room.
- Users not in your account: Only participants who are not on your Zoom account or are not logged in will be admitted to the waiting room. If not logged in, they will have an option to log in.
- Users who are not in your account and not part of your approved domains: Users who are on your account or logged in to a Zoom account at the domains you list will bypass the Waiting Room. After selecting this option, enter the domain(s), separating multiple domains by a comma.
Note: If "Users not in your account" or "Users who are not in your account and not part of your approved domains" is selected, you can allow those users who bypassed the waiting room to admit participants if the host is not in the meeting.
- Determine who can admit participants from the waiting room. For public events it is strongly recommended to set to Host and co-host only.
Applying the Waiting Room to your Meeting
If you follow the steps above to turn on the waiting room in your Zoom profile settings at: illinois.zoom.us/profile/setting the Waiting Roomwill be applied to all new meetings by default. Otherwise, you will need to apply the Waiting Room manually when scheduling new meetings.
Follow the steps below to apply the Waiting Room to your meeting

- Schedule a Zoom meeting as you normally would.
- Find the Security subsection
- Check the box next to the Waiting Room
For additional protection, we strongly recommend you use authentication to limit access to a Zoom event. .
Please refer to: Zoom, Using authentication to limit access to your virtual event for more information.
There are six separate meeting passcode settings. These are enabled, and locked on by default. All UIUC Zoom sessions require a passcode. Please review these settings; be aware of their scope and how they work.

This setting can be used to get more information about a participant before they attempt to join the meeting. You can choose to automatically or manually admit registered participants. We strongly recommend manually approving registrants.
If someone who registers should not be there, you can deny their registration request. If meeting creators determine an approved registrant should no longer have access, they can revoke their registration
For more information about Zoom's registration tool, please visit Zoom Support:
Additional Recommended Options
Joining participants can be muted automatically to prevent unwanted noise or distractions.
We strongly recommend this setting is enabled for public events
The setting for mute all participants when they join a meeting can be found in the Schedule Meeting subsection at illinois.zoom.us/profile/setting

You can find and confirm this setting has been applied to your meeting when scheduling. Mute participants upon entry can be found in the Meeting Options

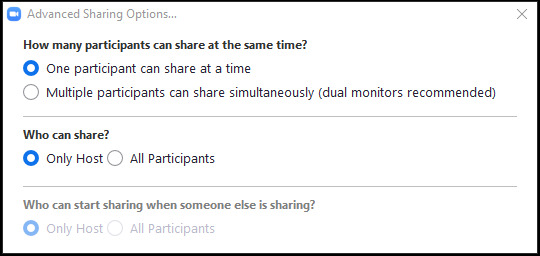
Meeting creators can set screen sharing to Host Only to prevent participants from taking over the screen during a meeting. During a meeting, Hosts can still allow users to Screen Share by either promoting them to co-host, checking Allow participants to: Share Screen in the in-meeting Security Tab or by using the Advanced Sharing Options during the meeting. Note: promoting individual users to co-host may give them more authority than you wish. Using the Security Tab or Advanced Sharing Options will allow all participants to share. Please weigh these options and choose what best protects your meeting
The host role is required to both promote a participant to co-host or alter the screen sharing options in-meeting.
By default, Screen Sharing is enabled and set to Host Only for UIUC Zoom accounts.Your default screen sharing setting can be in the In Meeting (Basic) section in your Zoom Profile Settings

Editing sharing options during a meeting:
Security Tab

Advanced Sharing Options
- During a meeting, Hosts can find the Advanced Sharing Options by clicking the caret(^) button in the upper right corner of the Share Screen button

- The window, shown below, will open where you can adjust your Screen Sharing settings

Meeting creators should disable Send files via chat unless required for collaboration purposes. Send files via chat can be found in the In Meeting (Basic) section at illinois.zoom.us/profile/setting
If you must send files in your meeting, we strongly recommend you restrict them by file type.
Alternatively, file sharing through Box or a Learning Management System (LMS), such as Illinois Compass 2g or Moodle.
Below is an example showing how to restrict file transfer to only allow PDFs (.pdf), Word documents (.docx), and text files (.txt).

Please disable Annotation unless you need it for collaboration purposes. If the presenter requires annotation during their lecture, please check the sub-setting: Only the user who is sharing can annotate.
By default, Annotation is enabled and set to Only the user who is sharing can annotate.
Annotation can be found in the In Meeting (Basic) section at illinois.zoom.us/profile/setting

Please disable this setting to keep removed participants from rejoining the meeting.
By default, Allow removed participants to rejoin is disabled
Allow removed participants to rejoin can be found in the In Meeting (Basic) section at illinois.zoom.us/profile/setting
IMPORTANT: Participants that are inadvertently dropped from the meeting because of poor internet or cellular connection will be allowed to rejoin.

Please disable this setting. This will prevent attendees from changing their name after they enter the meeting.
By default, Allow participants to rename themselves is disabled
Allow participants to rename themselves can be found in the In Meeting (Basic) section at illinois.zoom.us/profile/setting

This setting will label users not in the UIUC Zoom account as "Guests" in the participant listing. The guests themselves do not see that they are listed as "guests". This can help you identify potential users who may act disruptively.
By default, Identify guest participants in meeting/webinar is enabled
Identify guest participants in the meeting/webinar can be found in the In Meeting (Basic) section at illinois.zoom.us/profile/setting

Options for In-Progress Meetings
Once a meeting has started, you can use the options below to prevent or manage disruption.

The In meeting Security tab has many Zoom meeting protection controls consolidated in one place. You can do the following:
Lock Meeting: this stops anyone else from joining your meeting
Enable Waiting Room: turn on or off the waiting room while the meeting is in session. This setting will utilize your waiting room configuration found at: illinois.zoom.us/profile/setting
Hide Profile Picture: for public meetings hide participant profile pictures.
Allow Participants to:
Share Screen: another place to control the share screen feature. This setting should be disabled (unchecked) for public meetings.
Chat: Turn off the chat completely. See below for more granular chat settings. This setting should be disabled (unchecked) for public meetings.
Rename Themselves: This setting will grant users the ability to rename themselves during the Zoom meeting. This setting should be disabled (unchecked) for public meetings.
Unmute Themselves: Uncheck this setting if you want your participants to remain silent
Start Video: Uncheck this setting if you don't want to allow your participants to show their video
Remove Participant: this allows the host or co-host the ability to remove disruptive participants from the meeting
Suspend Participant Activity: stop all interactive participants features if your meeting is being disrupted.
IMPORTANT: If you want to make your meeting "View Only" turn on (check) Hide Participant Profile Pictures and turn off (uncheck) Share Screen, Chat, Rename Themselves, Unmute Themselves, and Start Video.
Use the advanced sharing options to adjust who can share their screen or other device during a meeting.
- Click the ^ icon (caret) to the right of the Share Screen button in the Zoom meeting toolbar.
- Click Advanced Sharing Options... in the drop-down menu.
- A new settings window will appear, allowing you to change sharing privileges.
In meeting Share Screen button
Advanced Sharing Options
During a meeting, you can choose who participants can chat with. If you can supervise chat, but only want to make it available for messaging between the host and the participants, change the setting to Host Only.
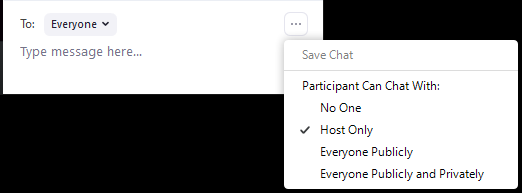
You can also restrict chat messages by default. The Chat setting can be found in the In Meeting (Basic) section at illinois.zoom.us/profile/setting
You can disable the chat for participants by default and prevent participants from saving the in meeting chat. You can also restrict private chat which would disable the ability for participants to send 1:1 chat messages to another participants. Finally, you can enable or disable auto-saving chats. Auto saving chats allow for hosts to automatically save the chat history at the end of the Zoom session. Note: a version of the chat history can be stored, when recording to the cloud. This setting can be found in your illinois.zoom.us settings under the "recording" tab.
Chat setting

Allow users to save chat sub setting

Private Chat setting

There are three muting options in meeting: Both settings can be configured during a meeting in progress. You should familiarize yourself with their location and functionality, because you may need to use them quickly.
- Mute All will mute all participants currently in the meeting.
- Allow participants to unmute themselves will mute all participants that join the meeting, and remove the ability for other participants to unmute themselves who are already muted. Allow participants to unmute themselves can be found in two locations within the Zoom desktop applications.
- Mute participants upon entry will mute as new participants join. They will have the ability to unmute themselves after they join.
Mute All
- Click the Participants button in the toolbar.
- Click Mute All at the bottom of the screen to mute all participants.

Disable allow participants to unmute themselves in Security Tab
- Click the Security button in the toolbar.
- Uncheck Unmute Themselves

Disable allow participants to unmute themselves in Participants window
- Click the Participants button from the toolbar.
- Select More or the ellipsis (...) button from the lower right corner of the Participants panel.
- In the drop down that appears, un-check Allow Participants to Unmute Themselves.

Mute all participants upon entry
- Click the Participants button from the toolbar.
- Select More or the ellipsis (...) button from the lower right corner of the Participants panel.
- In the drop down that appears, check Mute participants upon entry.

Preventing participants from renaming themselves can be found in two locations when using the Zoom Desktop application. The setting is located within the Security Tab and
Security Tab
- Click the Security button in toolbar.
- Uncheck Rename Themselves

Participants Window
- Click the Participants button from the bottom screen toolbar.
- Select More or the ellipsis (...) button from the lower right corner of the Participants panel.
- In the drop down that appears, un-check Allow Participants to Rename Themselves.

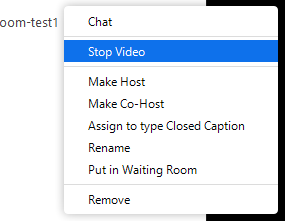
During a Zoom meeting hosts and co-hosts have two options to disable participant video. They can disable an individual participants video or all participants video.
Disable individual participant video
- Click the Participants button from the bottom screen toolbar to open the Participants panel.
- Hover your mouse over the attendee’s name and click More.
- Select Stop Video. The participant will no longer be able to turn video on for the duration of the meeting, unless the host re-enables the option.
Disable all participant video
- Click the Security button from the bottom screen toolbar.
- Uncheck Start Video under the Allow participants to section.

If a disruptive/unwanted participant has joined a meeting in progress, follow the steps below to suspend all participant activities.
When selected, this option will turn off all participant's video, audio, Zoom Apps, and ability to share their screen. Also lock the meeting to prevent participants from joining. This will apply to all participants, including those joined using a Zoom Room.
- Click the Security button from the bottom screen toolbar.
- Click Suspend participant activities

After the meeting has begun, you can lock the meeting, preventing anyone further from joining. Hosts and co-hosts can lock the meeting within the Security button or Participants window.
To lock the meeting, follow the steps below:
Locking the meeting using the Security Tab
- Click the Participants button from the bottom screen toolbar.
- Select More or the ellipsis (...) button from the lower right corner of the Participants panel.
- In the drop down that appears, check Lock Meeting.

Locking the meeting in the Participants window
- Click the Participants button from the bottom screen toolbar.
- Select More or the ellipsis (...) button from the lower right corner of the Participants panel.
- In the drop down that appears, check Lock Meeting.

If a disruptive/unwanted participant has joined a meeting in progress, follow these steps to remove them:
Removing a disruptive participant can be done in the Security button or within the Participants listing.
Removing attendee using the Security Tab
- Click the Security button in the toolbar.
- Select Remove participant.

Removing attendee using the participants listing
- Click the Participants button at the bottom of the Zoom window to open the Participants panel.
- Hover your mouse over the attendee you wish to remove, and click More.
- Click Remove.

If a disruptive/unwanted participant has joined a meeting in progress, follow the steps below steps to report them.
Important: reporting a user to Zoom requires that you work with Zoom support directly. They will reach out to you via email to confirm you report.
Using the Participants listing to report
- Click the Participants button at the bottom of the Zoom window to open the Participants panel.
- Hover your mouse over the attendee you wish to remove, and click More.
- Click Report.

Tips for Publicly Accessible Meetings
Purchase and use a webinar license if possible. Webinar licenses will restrict participants to view only, and if properly managed, webinars can effectively prevent disruptions. If a webinar license is not feasible, please use the tips below to configure a publicly accessible Zoom meeting.
- Turn off Join Before Host when scheduling the meeting.
- Log into your Zoom profile settings at illinois.zoom.us/profile/setting and reconfigure Annotation and file sharing.
- The host should join the meeting 5-10 minutes before the start and make sure that the open the in meeting Security Tab and turn on (check) Hide Participant Profile Pictures and turn off (uncheck) Share Screen, Chat, Rename Themselves, Unmute Themselves, and Start Video. Carefully consider turning on the waiting room.
- Click the Security Tab.
- After you're done it should look similar to what is shown below
Questions and Assistance