
Zoom, Breakout Rooms
Table of Contents
- Recording
- Enabling Breakout Rooms
- Starting and Managing Breakout Rooms
- In-Meeting configuring Breakout Room options
- Sharing Content from the Main Room to Breakout Rooms
- Viewing participant activity status in Breakout Rooms
Overview

Breakout Rooms:
- Allow hosts to partition their class into smaller sub sections or collaboration groups
- Are a great way for hosts to allow for smaller discussions or working groups during a Zoom Meeting
- Participants have full audio, video and the ability to screen share (if granted the permission to)
Limitations and Troubleshooting
- Attendees can participate in breakout rooms using Zoom Desktop or Mobile client, web client (Chrome, Firefox, Safari, Edge, Internet Explorer) or H.323/SIP device.
- Meeting hosts and co-hosts must use the Zoom Desktop client manage breakout rooms
- If you're having issues assigning co-hosts to help manage breakout rooms, please have all hosts and co-hosts update their Zoom desktop client.
- Up to 100 breakout rooms can be created in a single meeting
- Depending on your meeting capacity limitation**, up to 1000 participants can be assigned across all breakout rooms. A single room can hold up to 1000 participants.
- Preassigning participants to breakout rooms must be done when scheduling meetings at illinois.zoom.us or using the LTI tool in Illinois Canvas or Learn@Illinois
- Only one set of pre-assignments can be configured for a meeting. These assignments can be adjusted and changed, but it is not possible to store multiple sets of pre-assignments for one meeting or meeting series.
- You can only pre-assign users that have a Zoom account
- When joining a meeting with pre-assignments, participants need to be signed in to the Zoom account associated with the email address used for pre-assignments for the pre-assignment to be applied. If they are not signed in or signed in with a different account, the pre-assignment will not be applied to them.
- if you wish to pre-assign users using the grapical user interface, they must be UIUC Zoom account members
- You can pre-assign non U of I Zoom account members using a csv file
**The maximum capacities require a Large Meeting add-on. If you do not have a Large Meeting add-on, the maximum number of participants is limited by your meeting capacity.
Minimum Zoom client version restrictions:
- All users need to be upgraded to at minimum Zoom Desktop client 5.2 or higher to participate and manage Zoom breakout rooms if the meeting is hosted by a UIUC Zoom account.
Self-select Breakout Room (Zoom mobile and desktop clients)
- The host can now create breakout rooms with the option for participants to self-select which breakout room they would like to join. If enabled, participants can move freely between breakout rooms, without needing the host's help. The meeting host will need to use Zoom desktop client version 5.3.0 or higher. For meeting guests to participate in self-select breakout rooms they will need to be on Zoom mobile or desktop client version 5.3.0 or later.
Shared Host and Co-Host controls over breakout rooms (Zoom desktop client)
- For co-hosts to have control over breakout rooms, both the host and co-host must be using Zoom desktop client (Windows, MacOS or Linux) version 5.4.6 or higher.
Share screen to all breakout rooms (Zoom desktop client)
- Hosts, co-hosts, and breakout rooms participants must be upgraded to Zoom desktop version 5.7.0 or higher to share their screen across from the main session to all breakout rooms.
- Hosts and co-hosts need to be upgraded to Zoom desktop client version 5.10.0 or higher to share audio from the main session to all breakout rooms
View Participant Status Icons in Breakout Rooms
- Hosts and co-hosts need to be upgraded to Zoom desktop client version 5.10.3 or higher to view participant activity statuses in breakout rooms
Recording
- Cloud Recording: If the meeting is being cloud recorded, it will only record the main room, regardless of what room the meeting host is in.
- Local Recording: If local recording is being used, it will record the room the participant who is recording is in. Multiple participants can record locally.
Enabling
Check out Zoom support for more information about how to enable breakout rooms for personal use. NOTE: Breakout rooms are enabled by default for all UIUC Zoom accounts.
Starting and Managing Breakout Rooms
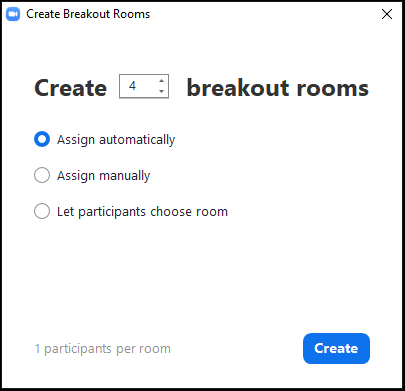
- During a meeting, click the "Breakout Room" button in the Meeting controls bar.
- Select automatically, then click create rooms at the bottom of the pop up. This will start the breakout rooms and randomly assign participants, equally, to the number of rooms you selected.
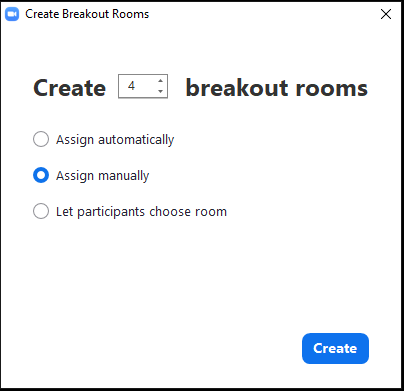
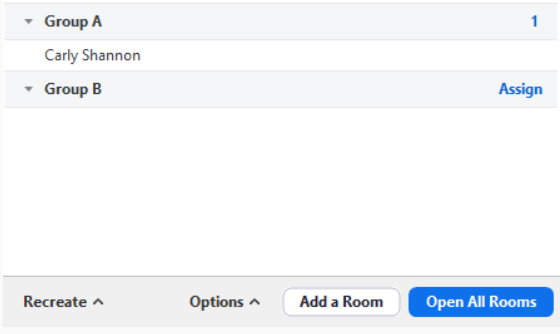
- During a meeting, click the "Breakout Room" button in the Meeting controls bar.
- Select the number of rooms you want and then click Assign manually as shown below. Then click create.
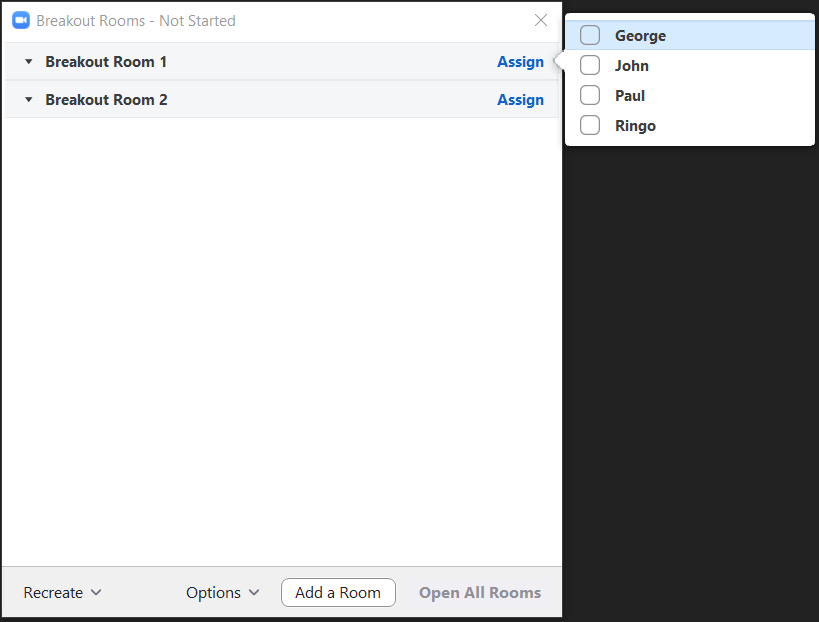
- A new window will pop up. Select the assign button to the right of the individual breakout room. Place participants into rooms as you see fit.
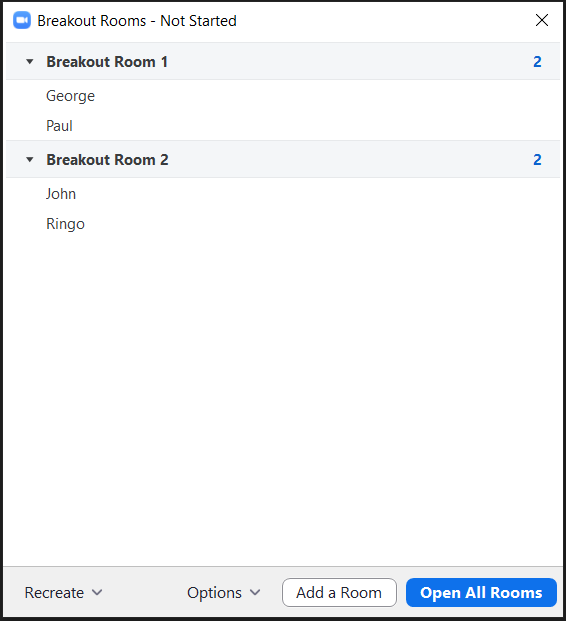
- After you have assigned the rooms to your liking click Open All Rooms to start the rooms.
The host can now create breakout rooms with the option for participants to self-select which breakout room they would like to join. If enabled, participants can move freely between breakout rooms, without needing the host's help. Both the meeting host and participants need to be on Client 5.3.0 or later to self-select Breakout Rooms.
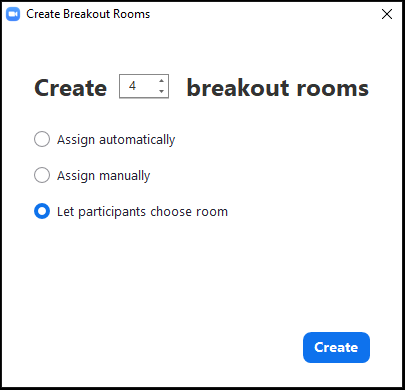
- During a meeting, click the Breakout Room button in the Meeting controls bar.
- Select the number of rooms you want and then click Let participants choose rooms as shown below. Then click create.
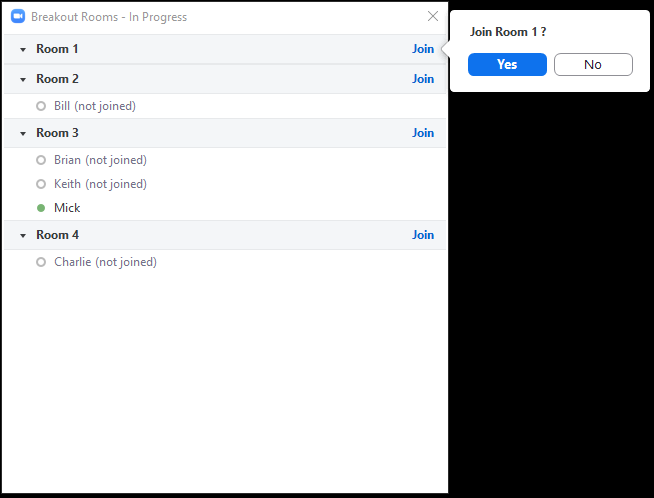
- Once you have configured and opened the rooms, your participants will be able to click the Breakout room button in their in meeting tool bar.
- They can then choose a room to join as shown below
- Preassigning participants to breakout rooms must be done when scheduling meetings at illinois.zoom.us or using the LTI tool in Illinois Canvas or Learn@Illinois
- Only one set of pre-assignments can be configured for a meeting. These assignments can be adjusted and changed, but it is not possible to store multiple sets of pre-assignments for one meeting or meeting series.
- You can only pre-assign users that have a Zoom account
- When joining a meeting with pre-assignments, participants need to be signed in to the Zoom account associated with the email address used for pre-assignments for the pre-assignment to be applied. If they are not signed in or signed in with a different account, the pre-assignment will not be applied to them.
- if you wish to pre-assign users using the web portal, they must be UIUC Zoom account members
- You can pre-assign non U of I Zoom account members using a csv file
Pre-assign using web portal
-
Sign in to illinois.zoom.us
-
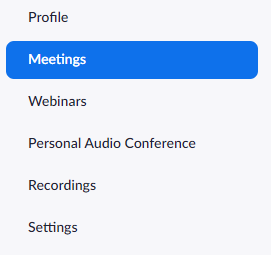
Click Meetings and schedule a meeting

-
Make sure to enable Join Before Host
-
-
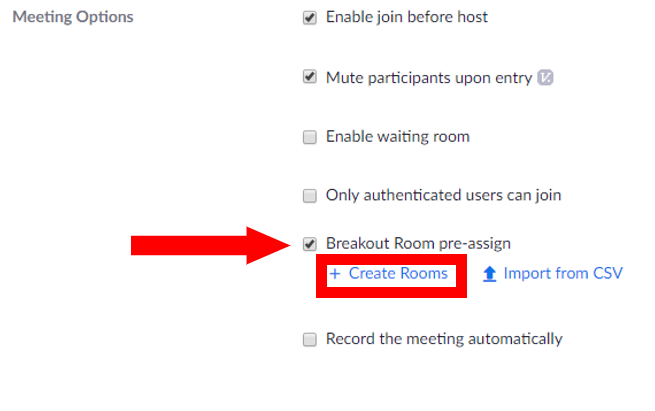
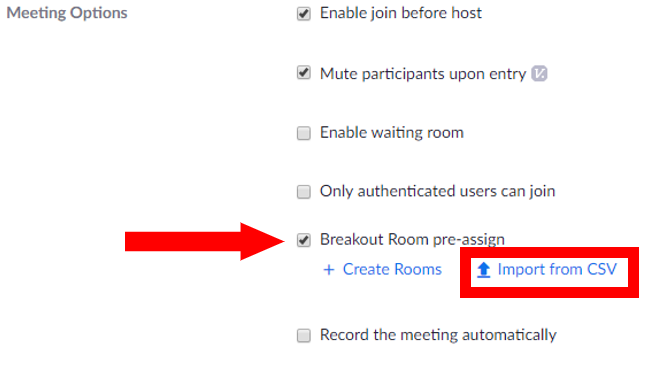
In the settings pane for the new meeting, scroll down until you find the Meeting Options. First check the box "Breakout Room pre-assign", highlighted by the arrow and then click "+ Create Rooms" highlighted by the box below.
-
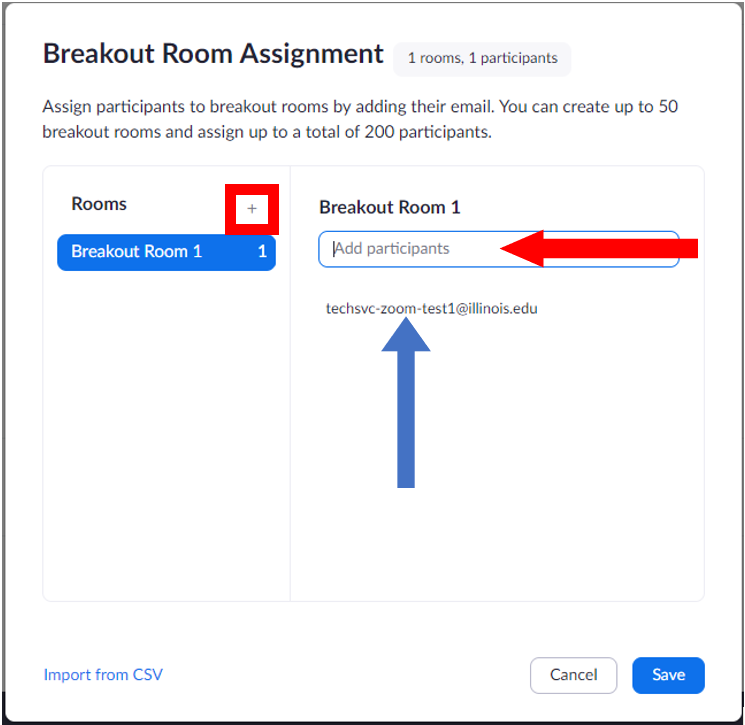
Click the "+" symbol to the left of "Rooms" to begin adding breakout rooms to your meeting. Once you have enough rooms, you can select the room on the left side of the window, then a search bar labeled "Add participants" will appear on the right. Search for the names of the users you want to add. IMPORTANT: These users must be U of I Zoom account holder to add to breakout rooms using the "+ Create Rooms" button. If you would like to add users who are external to U of I Zoom do so using the Import from CSV option.
-
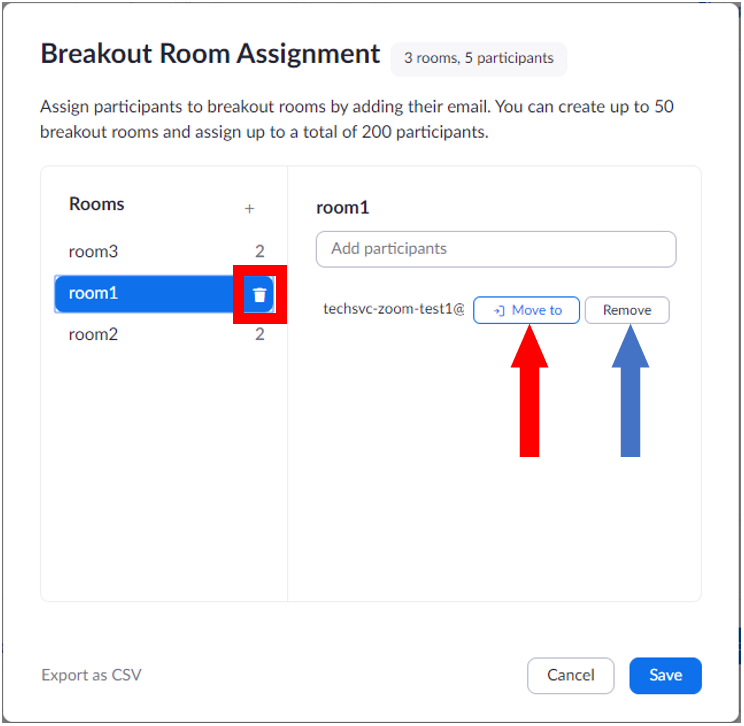
From this screen you can completely delete breakout rooms by selecting the room on the left column and clicking the trash can icon that appears to the right. This icon is highlighted using a red box in the image below. Of if you need to move any participant to a different room, hover over that participant's name in the listing on the right and select "Move to" highlighted below using the red arrow. If you would like to completely remove the participant from all breakout rooms select "Remove" highlighted using a blue arrow in the image below.
-
The click save.
-
Now during the meeting, when you select "breakout rooms" you will see this pre-assignment listing.
Pre-assign using CSV
- Sign in to illinois.zoom.us
- Download the Zoom Breakout CSV Template file. Fill it out according to the format specified in the document.
-
Click the Meetings tab on the upper left side of the screen:

-
Click "schedule a new meeting"

-
In the settings pane for the new meeting, scroll down until you find the Meeting Options. First check the box "Breakout Room pre-assign", highlighted by the arrow and then click "Import CSV" highlighted by the box below.
-
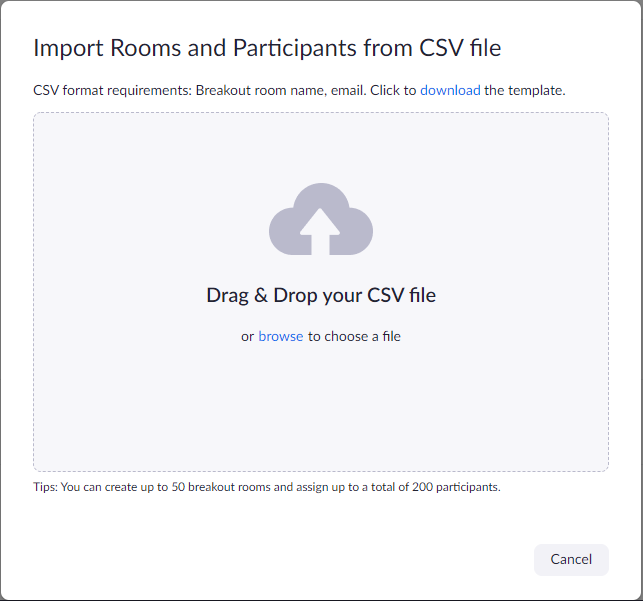
Click and drag your formatted CSV file from step 2 into the grey box shown below:
-
Check that everyone was placed into the rooms accordingly. From this screen you can completely delete breakout rooms by selecting the room on the left column and clicking the trash can icon that appears to the right. This icon is highlighted using a red box in the image below. Of if you need to move any participant to a different room, hover over that participant's name in the listing on the right and select "Move to" highlighted below using the red arrow. If you would like to completely remove the participant from all breakout rooms select "Remove" highlighted using a blue arrow in the image below.
-
Click save when finished.
-
Now during the meeting, when you select "breakout rooms" you will see this pre-assignment listing.
Starting a meeting with your pre-assigned breakout rooms:
- Start a meeting after pre-assiging participants using one of the methods above
- Click the breakout rooms in the meeting controls to access the breakout rooms you created
- Note:
- If a participant joins before you (the host), they will be automatically assigned to the breakout room you specified when scheduling the meeting.
- If a participant joins after you (the host), they will not be automatically assigned to the breakout room you specified when scheduling the meeting.
- Revert to pre-assigned breakout rooms to assign participants to their pre-assigned breakout rooms.
- Note:
- Click "Open All Rooms" to start the breakout rooms
- Note:
- If a participant joins after you started the breakout rooms, they won't be pre-assigned to the breakout room you specified when scheduling the meeting.
- If a participant is in their pre-assigned breakout room and they leave the meeting and rejoin, they won't rejoin their pre-assigned breakout room.
- You can manually assign participants using the in-meeting breakout room controls, or revert to pre-assigned breakout rooms.
- Note:
In-Meeting configuring Breakout Room options:
After you have created your rooms you can edit their behavior by clicking the Options button (Gear) in the lower left corner of the breakout room control window (shown below)
 In this options window, hosts and co-hosts have the ability to control the following breakout room behaviors:
Allow participants to choose room:
- This setting will allow you to create self select breakout rooms. You can do this after you have already pre-assigned or randomly assigned participants.
Allow participants to return to the main room at any time:
- If you want to allow participants to return to the main Zoom session, check this setting.
Automatically move all participants into breakout rooms
- This setting is great for class settings. If you enable this setting, when you click, Open All Rooms meeting attendees will be automatically migrated to their assigned breakout room.
Auto close breakout rooms
- Set a timer for the duration of your breakout rooms. By default this set to 10 minutes. Uncheck this option if you want your breakout rooms to last indefinitely.
Notify me when time is up
- This sub setting notifies you when the breakout rooms have expired.
Countdown after closing breakout rooms
- This setting allows you to provide a buffer so that participants within the breakout room will be notified they are closing soon and will therefore have time to finish up last minute discussions.
Countdown after closing breakout rooms
- This setting allows you to provide a buffer so that participants within the breakout room will be notified they are closing soon and will therefore have time to finish up last minute discussions.
Sharing Content from the Main Room to Breakout Rooms
Hosts and co-hosts can share content from the main session to breakout rooms. This requires Zoom client version 5.7.0 or higher. Sharing audio to all breakout rooms from the main session requires 5.10.0 or higher.
- Start breakout rooms and assign participants
- While still in the main session open the share screen option
- Select the content you wish to share
- Check Share to breakout rooms

- Click the share button at the bottom of the window.
Viewing participant status in Breakout Rooms
Hosts and co-hosts can monitor general pariticipant activities in the breakout room control panel. This requires Zoom client version 5.10.3 or higher. This feature can give hosts and co-hosts a general idea of the level of activity and engagement occuring in the breakout rooms.
Status icons that can be monitored for each breakout room participant include:
- If Audio/Video is enabled
- If they are sharing their screen
- Any nonverbal feedback icons enabled
IMPORTANT: This option must be checked in your UIUC Zoom Profile Settings
