Topics Map > Applications & Software > Banner
Banner - (9) Navigation Guide
This article provides navigational information for the Banner 9 upgrade.
Quick reference guide
Landing Page
Images may vary based upon your campus security settings.

-
Toggle Menu: Allows user to toggle between a long description of the menu bar items or just the icons.
-
Dashboard: Returns you back to the landing page from any page in Banner.
-
Applications: Displays Banner Applications by functional area in the general menu format.
-
Search: Opens the Search window. A page can be found either by description or the Banner acronym.
-
Recently Opened: Displays count of pages recently visited. Open the list and select a page to access it.
-
?: Help.
-
Favorites: Displays pages which have been designated as Favorites by the user
-
Sign Out: Click to log out of the application.
-
User: Displays the Banner user that is signed in.
-
University icon: Displays which university user is logged into.
-
Search options: Allows users to specify a search preference. The Search option allows for searching on page acronym or description, while Direct Navigation searches only on full page acronyms.

Application Navigator Keyboard Shortcuts (found under Help menu): Provides the keyboard shortcuts that can be used to access the items on the
left of the screen.
left of the screen.
General Page Navigation

Key block: The first block on most pages contains key information. The data in the key block determines what information is displayed on the rest of the page and stays for subsequent pages.
GO: Moves you out of the Key block.
GO: Moves you out of the Key block.

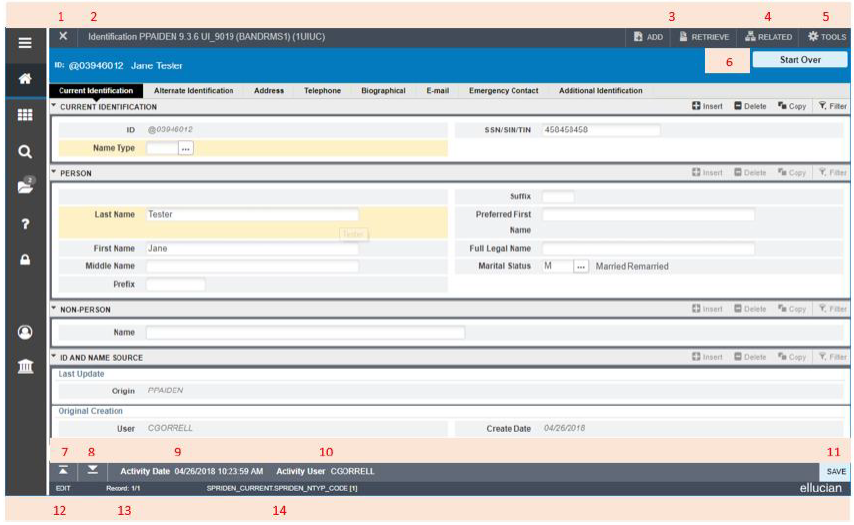
1. Page close icon X: Closes page.
2. Page title and Database: In this example it is Identification PPAIDEN (BANDRMS1).
3. Add and Retrieve icons: Used with imaging/Xtender (BDM).
4. Related Menu: Displays a list of related pages that can be accessed from this page.
5. Tools Menu: Includes refresh, export, print, clear record, clear data, item properties, display ID image, and other options controlled by the page.
6. Start Over: Allows you to return to the key block if you are in the body of the page.
7. Previous Section: Navigate to the previous section of data.
8. Next Section: Navigate to the next section of data.
9. Activity Date: The date the record was updated (not available on every page).
10. Activity User: The user id of the person who created the record (not available on every page).
11. Save: Saves changes on the page.
12. Edit: Not used.
13. Record Count: Displays total number of records as well as the record number being viewed.
14. Table and Field Name: Depending on what field the cursor is in, the underlying table and fieldname will be displayed.
Function buttons

1. Multiple or Single Record: Toggle between a multiple for single record view. This is found on some Finance and Student pages.
2. Insert: Insert Record
3. Delete: Delete Record
4. Copy: Copy Record
5. Filter: Select fields to filter by and click Go
2. Insert: Insert Record
3. Delete: Delete Record
4. Copy: Copy Record
5. Filter: Select fields to filter by and click Go
Expanded/Compact/Comfortable Layout
Pages can be viewed in either Expanded, Compact, or Comfortable page layout mode. The expanded mode presents less data on the page and more white space while the compact mode presents more data on the page and less white space. The Comfortable layout displays pages with increased word, letter, and line spacing. The page layout can be changed by going to Tools, Page Layout.

Filter/Search/Query
The filter, search, or query functionality has two options; Basic Filter and Advanced Filter. When you select Filter it will bring you into the Basic Filter which is similar to the Banner 8 functionality.
Basic Filter: this selection will default in a few of the key fields of your page and provides you the ability to add other fields.

Advanced Filter: this selection will also default a few of the key fields of your page and provides you the ability to add other fields. The additional functionality with this option is that there are more qualifiers for you to select on how you would like to search for our data, such as “Equals, Contains, Starts With, etc.”.

In either option you can enter as many fields as you would like. % can be used as a wildcard in the Basic Filter and in the Advanced Filter when using the qualifiers of Like, Starts With, or Ends With.

Click Go, and results are displayed.

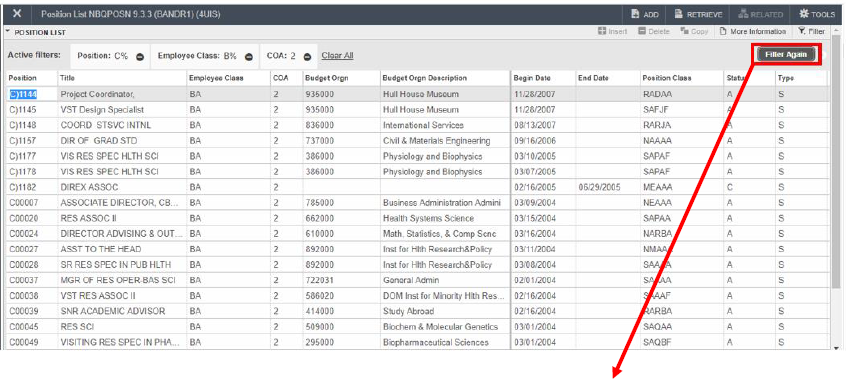
If desired record doesn’t not return, click Filter Again to return to the filter page.
System Messages: Success, Warnings, and Errors
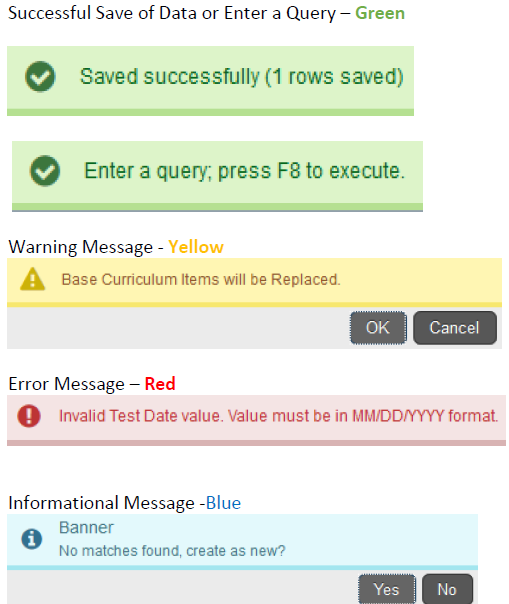
The Notification Center is located to the right of the Tools menu and displays the number of messages available for review. The following types of messages and information may be displayed:

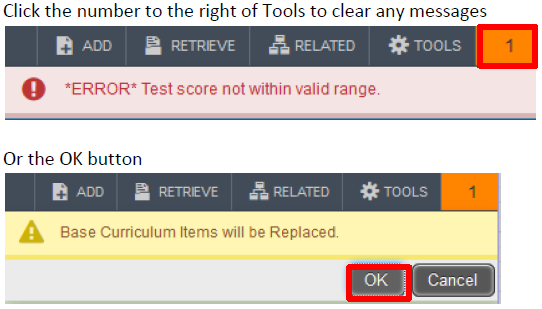
To clear message(s)

