EWS Labs, Remote access to your EWS Windows home directory
Overview
This page describes how to access files in your EWS Windows home directory remotely.If you're connecting from off-campus, a Technology Services VPN connection using the "2_TunnelAll" option is required before the EWS home directory can be mapped. If you're connecting from on-campus, the wired network and IllinoisNet wireless will allow the home directory to be mapped.
Below are instructions for an EWS Windows computer and personal Windows and macOS devices. Please note that EWS support for personal devices is best-effort, and that these instructions are provided for reference only. EWS cannot guarantee that remote access to our systems will be compatible with your personal device.
EWS home directories are only meant to provide enough space for instructors and students to work on their courses for the current semester. Data will not persist beyond the current semester. At the end of each semester, we strongly recommend moving important files to the free cloud storage provided through your campus account, such as OneDrive, Box, or Google Drive (sign into these services with your campus account).
From an EWS Windows computer
- Log into an EWS Windows computer.
- Open File Explorer.
- Browse to the U: drive.
From Windows
- If connecting from off-campus, connect to the Technology Services VPN using the "2_TunnelAll" option
- Open Windows File Explorer by clicking on the folder icon in the taskbar.
- Right-click on This PC and select Map network drive.

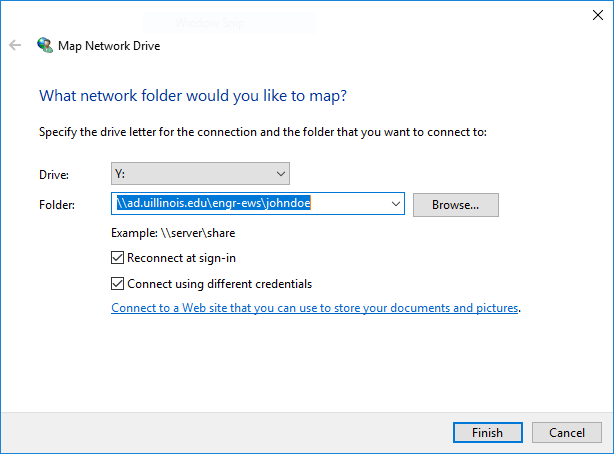
- A Map Network Drive window will appear. Select a Drive letter and input the Folder path.
- For Drive: select a drive letter not already in use on your computer.
-
To connect to your Engineering home folder, input the following with your netID: \\ad.uillinois.edu\engr-ews\YourNetID (i.e., \\ad.uillinois.edu\engr-ews\johndoe).
-
To have the drive available at all times, check the Reconnect at logon box. Please remember that if you are disconnected from the Technology Services VPN, you will receive an error message about the mapped drive until you are connected to the VPN again.
-
For non-university managed computers, check 'Connect using different credentials'.
-
Click Finish.
- For Drive: select a drive letter not already in use on your computer.
-
- A Windows Security box will ask for login information for the network file share.
-
For the username, enter UOFI\YourNetID as the username (i.e. UOFI\JohnDoe). Note that the slash is a backslash (\). The password will be your Active Directory password.
-
- If the connection is successful, a drive for the home directory will appear.
From macOS
- If connecting from off-campus, connect to the Technology Services VPN using the "2_TunnelAll" option
- If you are using a Mac with a newer operating system after step 11 in the VPN service instructions linked above you may also need to enable the Cisco Socket Filter extension in order for your vpn connection to work. If this is the case your Mac will give you a notice that the system extension is blocked. To fix this click on the open system settings button at the bottom of the notice. Once in your general system settings click on the information button next to network extensions.

- Once in network extensions enable the Cisco Secure Client - Socket Filter then click done (shown below). If you have done this correctly you Mac will give you a system extension enabled success screen. You may now continue on with the instructions to connect to your Windows home directory.
- If you are using a Mac with a newer operating system after step 11 in the VPN service instructions linked above you may also need to enable the Cisco Socket Filter extension in order for your vpn connection to work. If this is the case your Mac will give you a notice that the system extension is blocked. To fix this click on the open system settings button at the bottom of the notice. Once in your general system settings click on the information button next to network extensions.

- Click on the Apple menu and select "System Settings"

- Click on the network option you are using in the left hand menu. If using WiFi select that , if using Ethernet you will need to click on Network in the left hand menu then Ethernet in the menu that shows up (shown below). The steps to set up your network are the same after that.

- Click on "Details"

- Click on DNS in the left hand menu
- Click on the small plus under the "search domains" section

- Add "ad.uillinois.edu" and "illinois.edu" (without quotes) to the search domains list

- Restart your computer.
- Now that you have set up your vpn settings if you are off campus make sure to connect to the campus vpn using the "2_TunnelAll" option at this point then continue with step 9. If you need instructions to connect to the vpn on your Mac refer to the instructions linked above at the beginning of these steps.
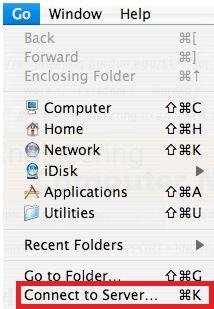
- The Finder menu will appear at the top of the screen. Select the Go menu, then click Connect to server.
- A 'Connect to Server' window will appear.
- In the 'Server Address' field, enter the following with your NetID to connect to your EWS home folder: smb://ad.uillinois.edu/engr-ews/YourNetID (i.e., smb://ad.uillinois.edu/engr-ews/johndoe). You could also enter your department's file-server path, as shown in the screenshot below.

-
If you wish to save this path for future use, click the + after entering the path to save it in the Favorite Servers: box below.
-
Click Connect.
- In the 'Server Address' field, enter the following with your NetID to connect to your EWS home folder: smb://ad.uillinois.edu/engr-ews/YourNetID (i.e., smb://ad.uillinois.edu/engr-ews/johndoe). You could also enter your department's file-server path, as shown in the screenshot below.
- An SMB File System Authentication window will appear.
- For Connect As, select the "Registered User" radio button.
-
For Name, enter your campus UOFI\NetID.
-
For Password, enter your Active Directory password.

- For Connect As, select the "Registered User" radio button.
- If the connection is successful, a drive for the network file share will pop up. However, you can also find it in your home menu by clicking on the Apple "Go" menu then selecting "Home". The home menu will appear and you can find a link to your Windows directory in the left hand menu (shown below).

- To disconnect from your Windows Home directory you can click the eject button next to it in the menu (shown in the screenshot above) or simply disconnect from Cisco VPN.
Short URL for this page: https://go.illinois.edu/ews-remote-homedir-windows


