Topics Map > Communication and collaboration > cPanel web hosting
cPanel, How to install WordPress on cPanel
Overview
WordPress is a popular website content management and blog platform that can be used to get a basic website up quickly or customized for more complicated sites. This article will cover how to get WordPress installed in your cPanel account. If you are a WordPress beginner, you might find this training from LinkedIn Learning helpful for understanding WordPress itself.
Installing WordPress using Softaculous
Softaculous is a one click installation utility that makes it easy to install WordPress.
- Login to your cPanel account at https://web.illinois.edu
- Find “WordPress” in the Softaculous section of your cPanel dashboard and click it.
- Click the Install Now button.
- Use the recommended settings below to complete your configuration.
Software Setup section
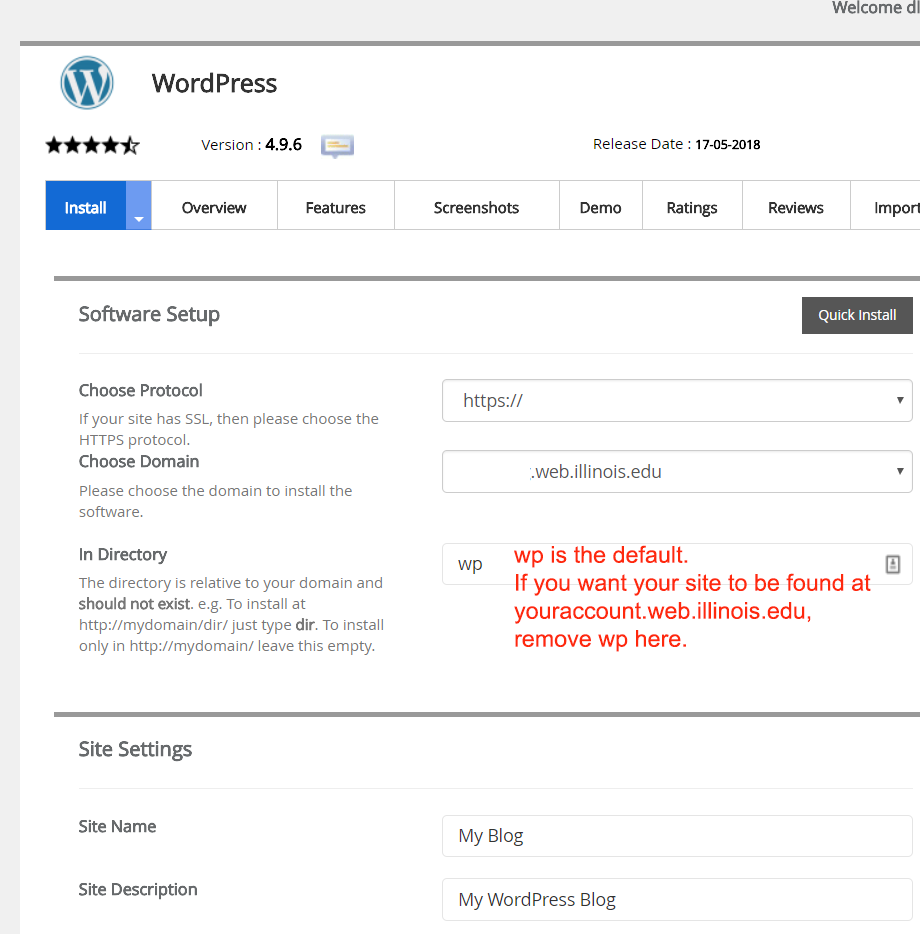
- Choose Protocol: Leave as “https”
- Choose Domain: Normally your domain will be yourcPanelAccount.web.illinois.edu. That is your default domain and will automatically be filled in.
- If you are going to use a custom domain (see cPanel, How to get a custom domain ), enter the custom domain here.
- If you are going to use a custom domain (see cPanel, How to get a custom domain ), enter the custom domain here.
-
In Directory: If you want your website to display at yourcPanelAccount.web.illinois.edu, and you haven't installed anything there previously, remove the “wp” in this field and leave this field empty.
If you want it to be yourcPanelAccount.web.illinois.edu/something, this location is where you would enter 'something'.
(If you've installed something at the same location previously, check the cPanel, "An installation already exists" error page for guidance on what to do next.)
Adjusting where you install WordPress
Site Settings
- Site Name: Enter a descriptive name for your website (for example, "CS 491 Final Project" or "(Your name's) Portfolio")
- Site Description: Enter a brief description of your site if you would like one.
- Do NOT choose Enable Multisite.
Admin Account
- Admin Username: This is the username you will enter to gain administrative access to your WordPress website in order to create the site and make changes to it. We recommend you NOT choose “admin” or your NetID.
- Admin Password: Accept the generated password or create one of your own. Make sure you know this password.
- Admin Email: Enter the email address you would like associated with the Admin Username. This email address will be used if you forget your WordPress password and need it to be reset.
Choose Language
- Select Language: Select your preferred language.
Select Plugin(s)
- Limit Login Attempts: WordPress is a target for hackers so it is a good idea to choose to install the Loginizer Plugin by checking the box.
Choose Theme
Advanced Options
- Database Name – WordPress saves your web page designs and content in a MySQL database. The software installation process will install and configure the database for you.
- Table Prefix: This prefix will be added to WordPress database tables. You can leave it as the default or change it to whatever you prefer.
- Disable Update Notifications Emails: We suggest you NOT disable notification emails
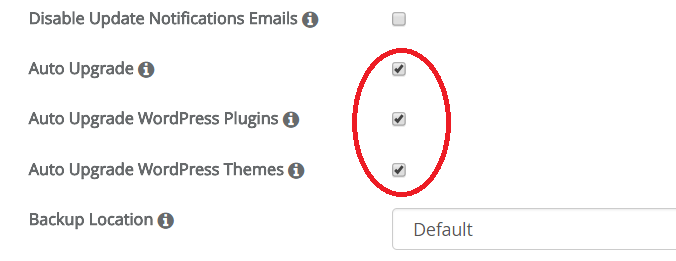
- Auto Upgrade: WordPress MUST be kept updated. Keep the Auto Upgrade checked and Softaculous will take care of the upgrades automatically for you.
- Auto Upgrade WordPress Plugins: Plugins are often the source of entry for hackers. Check the box to have your plugins automatically updated.
-
Auto Upgrade WordPress Themes: Themes are often the source of entry for hackers. Check the box to have your themes automatically updated.
Recommended settings - Backup Location: It is a good idea to backup your website. Softaculous will create a backup of your website files and the database. Choose the location as Default which will place your backups in your WordPress directory.
- Automated Backups: You can choose how often to automatically back up your site.
- Backup Rotation: This is how many backups Softaculous will keep before deleting them. Keep in mind these backups will use part of your 1 Gb of available disk space.
Select Theme
And finally ...
Press “Install”. Softaculous will install WordPress and will let you know when the installation is complete.
Getting started with WordPress
After WordPress is installed, use the admin name and password you created (under Admin Account above) to log in to WordPress and begin creating your web pages. From this point, WordPress' own Getting Started documentation or LinkedIn Learning's WordPress 5 Essential Training can help you progress further.


